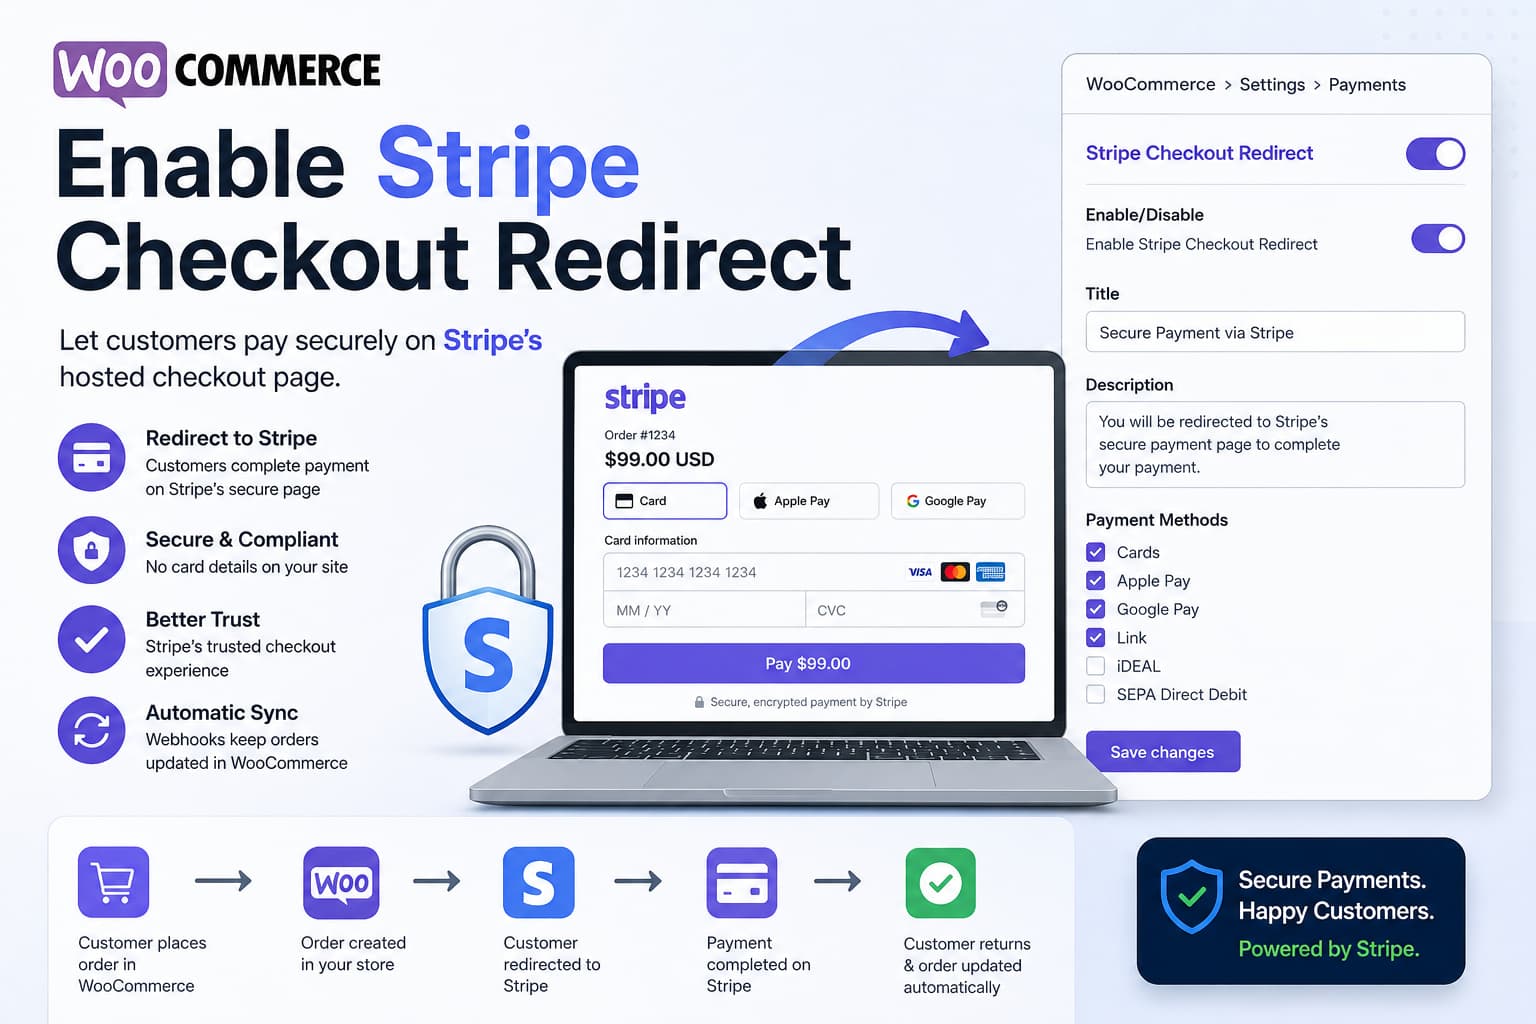
WooCommerce store owners sometimes prefer not to display credit card fields directly on their website. Instead, they want customers to leave the WooCommerce checkout page temporarily, complete payment on Stripe’s secure hosted page, and then return to the store’s order confirmation page.
A common question is:
I do not want customers to enter card details on my website. The documentation mentions “Checkout Redirect,” but I cannot find the setting. Where is it, and how do I enable it?
The answer depends on which Stripe plugin is installed.
The Checkout Redirect option is available in the Payment Gateway for WooCommerce with Stripe by Pay Addons plugin. It is not a standard setting in the official WooCommerce Stripe Payment Gateway plugin.
This guide explains how to identify the plugin you are using, enable Stripe Checkout Redirect, configure webhooks, test the complete payment flow, and fix the most common redirect problems.
Quick Answer
When using the Payment Gateway for WooCommerce with Stripe by Pay Addons plugin, go to:
WooCommerce > Settings > PaymentsFind:
Stripe Checkout RedirectEnable the payment method, open its settings, configure the available payment methods, and save your changes.
You can also open the Pay Addons plugin screen, select Payment Methods, locate the Checkout Redirect card, and click Setup. The plugin documentation describes both methods.
When using the official WooCommerce Stripe Payment Gateway, you will not find this option because that plugin uses Stripe’s embedded payment interface instead of redirecting customers to a Stripe-hosted Checkout page.
What Is Stripe Checkout Redirect?
Stripe Checkout Redirect sends the customer from your WooCommerce checkout to a payment page hosted by Stripe.
The general process is:
- The customer adds products to the WooCommerce cart.
- The customer enters the required billing and shipping information.
- The customer chooses Stripe Checkout Redirect.
- WooCommerce creates the order.
- The customer is redirected to Stripe.
- The customer enters payment information on the Stripe-hosted page.
- Stripe processes the payment.
- The customer returns to the WooCommerce order-received page.
- Stripe sends webhook notifications to update the order status.
Stripe describes its hosted Checkout flow as a prebuilt payment page where customers enter payment details on a Stripe-hosted page and return to the merchant’s website after completing payment.
Why Is the Checkout Redirect Setting Missing?
The most common reason is that the documentation and the installed plugin do not match.
Several WooCommerce Stripe plugins have similar names, but they do not offer identical features.
Official WooCommerce Stripe Payment Gateway
The official WooCommerce extension normally displays Stripe payment fields inside the WooCommerce checkout page.
It supports:
- Credit and debit cards
- Apple Pay
- Google Pay
- Link by Stripe
- Local payment methods
- Buy now, pay later options
- The Optimized Checkout Suite
However, it does not currently include a native setting that redirects normal card payments to the Stripe-hosted Checkout page.
Payment Gateway for WooCommerce with Stripe by Pay Addons
This separate plugin includes a payment method named:
Stripe Checkout RedirectIts WordPress plugin listing specifically describes support for a Stripe-hosted checkout flow. The redirect feature is listed separately from features marked as Pro, such as its embedded Checkout Form and Express Checkout options.
Therefore, checking the exact plugin name is the first troubleshooting step.
Step 1: Confirm Which Stripe Plugin Is Installed
Open:
WordPress Dashboard > Plugins > Installed PluginsLook for the active Stripe payment plugin.
You may see one of these:
WooCommerce Stripe Payment Gatewayor:
Payment Gateway for WooCommerce with Stripe – by Pay AddonsDo not assume that all plugins containing “WooCommerce” and “Stripe” provide the same checkout system.
It is also best to avoid enabling two different Stripe gateway plugins simultaneously. Multiple Stripe integrations can create duplicate checkout methods, conflicting scripts, duplicated webhook handling, or confusing payment settings.
Step 2: Install or Activate the Correct Plugin
To use the Pay Addons Checkout Redirect feature:
- Go to Plugins > Add New Plugin.
- Search for Payment Gateway for WooCommerce with Stripe by Pay Addons.
- Install the plugin.
- Activate it.
- Open its Stripe configuration screen.
- Connect the Stripe account or enter the required Stripe API credentials.
Before changing payment plugins on a live store, create a backup and test the configuration on a staging website.
Do not deactivate an existing live payment gateway until the replacement has completed at least one successful test-mode payment.
Step 3: Enable Stripe Checkout Redirect
After activating the Pay Addons plugin, go to:
WooCommerce > Settings > PaymentsFind:
Stripe Checkout RedirectEnable the gateway and click its Manage, Finish setup, or configuration button.
An alternative route is:
Pay Addons > Payment Methods > Checkout Redirect > SetupThe exact button wording may vary slightly between plugin versions, but the payment gateway should appear under WooCommerce’s Payments settings.
Step 4: Configure the Checkout Redirect Gateway
The Checkout Redirect settings can include the following fields:
Enable or Disable
Turn on the gateway so it appears during WooCommerce checkout.
Title
This is the payment method name customers see.
For example:
Credit Card and Other Payment Methodsor:
Secure Payment via StripeDescription
Explain that the customer will be redirected securely.
For example:
You will be redirected to Stripe’s secure payment page to complete your payment.Icon
Upload or select an optional payment icon.
Avoid uploading an oversized image because it may affect the checkout layout on mobile devices.
Payment Methods
Choose the Stripe payment methods that should be available.
Available methods depend on factors such as:
- The Stripe account’s country
- The customer’s country
- The WooCommerce currency
- The transaction currency
- Whether the payment method is enabled in Stripe
- Device and browser compatibility
For example, iDEAL or EPS may not appear when the WooCommerce store uses an unsupported currency. The plugin documentation notes that displayed methods follow the store’s current WooCommerce currency.
After configuring the gateway, click Save changes.
Step 5: Enable Payment Methods in Stripe
Log in to the Stripe Dashboard and review the payment method configuration connected to the WooCommerce website.
Confirm that the required methods are active.
Possible options include:
- Cards
- Apple Pay
- Google Pay
- Link
- iDEAL
- SEPA Direct Debit
- Bancontact
- Klarna
- Afterpay
- Other account-supported methods
A payment method enabled in WordPress may still remain unavailable when it is disabled, restricted, or unsupported in the connected Stripe account.
Availability can also change according to the customer’s location, device, browser, currency, and transaction type.
Step 6: Configure Stripe Webhooks
A successful browser redirect should not be the only method used to confirm payment.
Customers can close the browser after paying, lose their connection, or fail to return to the WooCommerce order confirmation page. Webhooks allow Stripe to notify WooCommerce directly about payment events.
The Pay Addons documentation states that webhooks are required for some delayed-notification methods, including SEPA, and for refund synchronization.
Find the Webhook URL
Open the Pay Addons Stripe settings in WordPress and copy the displayed:
Webhook URLAdd the Endpoint in Stripe
In the Stripe Dashboard:
- Open Developers.
- Open Webhooks.
- Click Add endpoint.
- Paste the webhook URL from WordPress.
- Select the necessary events.
- Create the endpoint.
Relevant events listed in the plugin documentation include:
charge.succeeded
charge.failed
charge.captured
charge.refunded
charge.refund.updated
checkout.session.completed
checkout.session.async_payment_succeeded
checkout.session.async_payment_failed
checkout.session.expired
payment_intent.payment_failed
payment_intent.succeeded
payment_intent.amount_capturable_updated
payment_intent.requires_action
Add the Signing Secret
After creating the webhook endpoint, copy its signing secret.
It normally begins with:
whsec_Paste it into the plugin’s webhook-secret field and save the settings.
Webhook signature verification helps prevent unauthorized requests from being treated as genuine Stripe notifications.
Step 7: Test the Complete Redirect Flow
Enable test mode before accepting real payments.
Run a complete test order and verify each stage.
Before Payment
Confirm that:
- Products can be added to the cart.
- Shipping is calculated correctly.
- Taxes are correct.
- Coupons work as expected.
- Stripe Checkout Redirect appears as a payment option.
- The payment description clearly explains the redirect.
During Payment
Confirm that:
- Clicking Place order creates the WooCommerce order.
- The browser redirects to a genuine Stripe-hosted URL.
- The correct amount and currency appear.
- The order description or product details are correct.
- The expected payment methods appear.
- The Stripe page works on desktop and mobile.
After Payment
Confirm that:
- Stripe accepts the test payment.
- The customer returns to the WooCommerce order-received page.
- The WooCommerce order changes to Processing or Completed.
- Stock is reduced correctly.
- Customer and administrator emails are delivered.
- The Stripe payment ID is recorded in the order.
- The webhook endpoint returns HTTP status
200. - A failed payment does not mark the order as paid.
- Cancelling on Stripe returns the customer to an appropriate page.
Do not switch to live mode until successful, failed, cancelled, and delayed payment scenarios have been tested.
The Official Stripe Plugin Is Still Secure
Some store owners assume that displaying a card field on their website means their WordPress server receives or stores the card number.
That is not necessarily true.
Stripe Elements tokenizes sensitive payment details inside Stripe’s payment component without allowing those details to touch the merchant’s server.
Therefore, the official WooCommerce Stripe plugin’s embedded checkout is not the same as building a normal HTML card form that submits raw card details to WordPress.
The difference is primarily the customer experience:
Embedded Stripe Elements
- The customer remains on the WooCommerce website.
- Stripe-controlled fields appear inside checkout.
- The design can integrate more closely with the store.
- Sensitive payment information is tokenized by Stripe.
Stripe-Hosted Checkout
- The customer leaves the website temporarily.
- Payment is completed on Stripe’s hosted page.
- The customer returns after payment.
- Customization is more limited.
- Some customers may recognize and trust the Stripe-hosted environment.
Both approaches can be secure when implemented correctly.
Express Checkout Is Not Checkout Redirect
Apple Pay, Google Pay, Amazon Pay, and Link buttons are generally described as express checkout methods.
They are not the same as redirecting all card payments to Stripe Checkout.
The official WooCommerce Stripe extension lets store owners enable supported express methods under:
WooCommerce > Settings > Payments > Stripe > Payment MethodsHowever, enabling an express checkout button does not create a general Stripe-hosted Checkout option for every customer.
Troubleshooting: Stripe Checkout Redirect Still Does Not Appear
1. Confirm the Correct Plugin Is Active
Check the plugin name again.
The official WooCommerce Stripe plugin does not contain the Pay Addons Checkout Redirect gateway.
2. Update WooCommerce and the Stripe Plugin
An outdated plugin may fail to register its payment gateway correctly.
Update on staging first, then clear all caches.
3. Check That the Gateway Is Enabled
Open:
WooCommerce > Settings > PaymentsConfirm that Stripe Checkout Redirect is enabled.
4. Confirm Stripe Credentials
Make sure the API credentials belong to the intended Stripe account.
Also check that test credentials are not being used while the plugin is in live mode, or vice versa.
Stripe test keys normally begin with:
pk_test_
sk_test_
Live keys normally begin with:
pk_live_
sk_live_
Never expose the secret key publicly.
5. Check Store Currency
Some payment methods only support specific currencies.
Temporarily test with standard card payments to determine whether the gateway itself works before troubleshooting an individual local method.
6. Clear Checkout Caches
Clear:
- WordPress cache
- Server cache
- Object cache
- CDN cache
- Browser cache
Exclude the following pages from full-page caching:
/cart/
/checkout/
/my-account/
/order-received/
7. Check for Plugin Conflicts
Temporarily test with:
- A default WordPress theme
- Only WooCommerce
- Only the required Stripe plugin
Payment customization, checkout-field, funnel, subscription, multicurrency, caching, and security plugins can affect the checkout request or redirect response.
Perform this test on staging rather than disabling production functionality.
8. Review WooCommerce Logs
Open:
WooCommerce > Status > LogsLook for recent logs containing:
stripe
checkout
payment
fatal
Review errors around the exact time of the test order.
9. Check the Browser Console
Open the checkout page, press F12, and inspect the Console and Network tabs.
Look for:
- JavaScript errors
- Blocked Stripe scripts
- Content Security Policy errors
- Failed AJAX requests
- HTTP 403 responses
- HTTP 500 responses
- Redirect loops
- Requests blocked by a firewall
10. Verify the Webhook Response
Open the Stripe webhook endpoint and inspect recent deliveries.
A successful webhook request should normally receive:
200 OKRepeated 403, 404, or 500 responses indicate that WordPress is rejecting or failing to process Stripe’s notification.
Redirect Loops After Clicking Place Order
When checkout repeatedly reloads or redirects back to the cart, check:
- WooCommerce checkout and cart page assignments
- WordPress permalink settings
- HTTPS configuration
- Mixed HTTP and HTTPS URLs
- Cache exclusions
- Security firewall rules
- Checkout customization plugins
- Custom redirect snippets
- Incorrect success or cancellation URLs
Also confirm that the WooCommerce pages use the same primary domain.
For example, switching between these can cause session or cookie problems:
https://example.com
https://www.example.com
Choose one primary version and redirect the other consistently.
Orders Remain Pending After Successful Payment
When Stripe shows a successful payment but WooCommerce leaves the order as Pending payment, the likely causes include:
- Missing webhook endpoint
- Incorrect webhook URL
- Incorrect signing secret
- Webhook requests blocked by a firewall
- Stripe test and live modes being mixed
- A PHP fatal error while processing the webhook
- An unsupported delayed payment method
- A plugin conflict changing order statuses
Check the Stripe webhook delivery first.
A successful customer redirect alone is not sufficient for reliable order synchronization.
Important Compatibility Considerations
Before replacing the current Stripe gateway, test all store-specific features, including:
- WooCommerce Subscriptions
- Saved payment methods
- Pre-orders
- Deposits
- Bookings
- Product add-ons
- Checkout fields
- Multicurrency
- Automatic tax
- Coupons
- Partial refunds
- Order-status automation
- Membership activation
- Analytics and conversion tracking
A hosted checkout integration may not transfer every custom WooCommerce checkout field to Stripe.
The WooCommerce order may still contain the information, but custom development may be required when that information must also appear in the Stripe Checkout Session.
External payment redirects can also affect browser-based GA4 purchase tracking. Confirm that Stripe returns customers to the WooCommerce order-received page and that the purchase event fires only once. Add an internal link here to the existing GA4 WooCommerce ecommerce tracking guide on DebugNexus.
Frequently Asked Questions
Where is Checkout Redirect in WooCommerce?
When using the Pay Addons Stripe plugin, go to:
WooCommerce > Settings > Payments > Stripe Checkout RedirectYou can also locate Checkout Redirect under the plugin’s Payment Methods screen.
Why can’t I find Stripe Checkout Redirect?
You are probably using a different Stripe plugin. The official WooCommerce Stripe Payment Gateway does not currently provide a native Stripe-hosted Checkout redirect option.
Can the official WooCommerce Stripe plugin redirect customers to Stripe Checkout?
Not through its standard settings. It uses Stripe’s embedded payment components. A different plugin or custom Stripe Checkout integration is required for a fully hosted redirect flow.
Is entering card details on an embedded Stripe form unsafe?
Not automatically. Stripe Elements tokenizes sensitive payment details without sending the raw card information through the WordPress server.
Do I need an SSL certificate when using hosted Stripe Checkout?
Yes. The WooCommerce site should use a valid SSL certificate and load entirely over HTTPS, even when the final payment form is hosted by Stripe.
Can Apple Pay and Google Pay appear on the hosted page?
They may appear when enabled in Stripe and supported by the customer’s device, browser, location, currency, and saved wallet configuration.
Should I use two Stripe plugins together?
Usually not. Use one primary Stripe gateway unless a developer has deliberately configured both plugins to avoid duplicate gateways, conflicting scripts, and duplicated webhook processing.
Why does the order stay pending after payment?
The most common cause is a missing, blocked, or incorrectly configured Stripe webhook. Check the webhook URL, signing secret, event deliveries, WooCommerce logs, and server firewall.
Final Solution
The Checkout Redirect setting has not necessarily disappeared.
It belongs to a specific Stripe integration.
When using Payment Gateway for WooCommerce with Stripe by Pay Addons, enable it from:
WooCommerce > Settings > Payments > Stripe Checkout RedirectWhen using the official WooCommerce Stripe Payment Gateway, no equivalent hosted Checkout Redirect setting is currently available. That plugin keeps customers on the WooCommerce checkout page and securely collects payment information through Stripe’s embedded payment fields.
For a reliable hosted checkout setup:
- Confirm the exact Stripe plugin.
- Enable Stripe Checkout Redirect.
- Configure the Stripe API connection.
- Enable the required payment methods.
- Configure and verify webhooks.
- Test successful, failed, cancelled, and delayed payments.
- Confirm the customer returns to the WooCommerce order-received page.
- Verify order statuses, stock, emails, refunds, and analytics before enabling live mode.
This prevents customers from entering payment details directly into the visible WooCommerce checkout interface while preserving WooCommerce order management and Stripe payment processin
