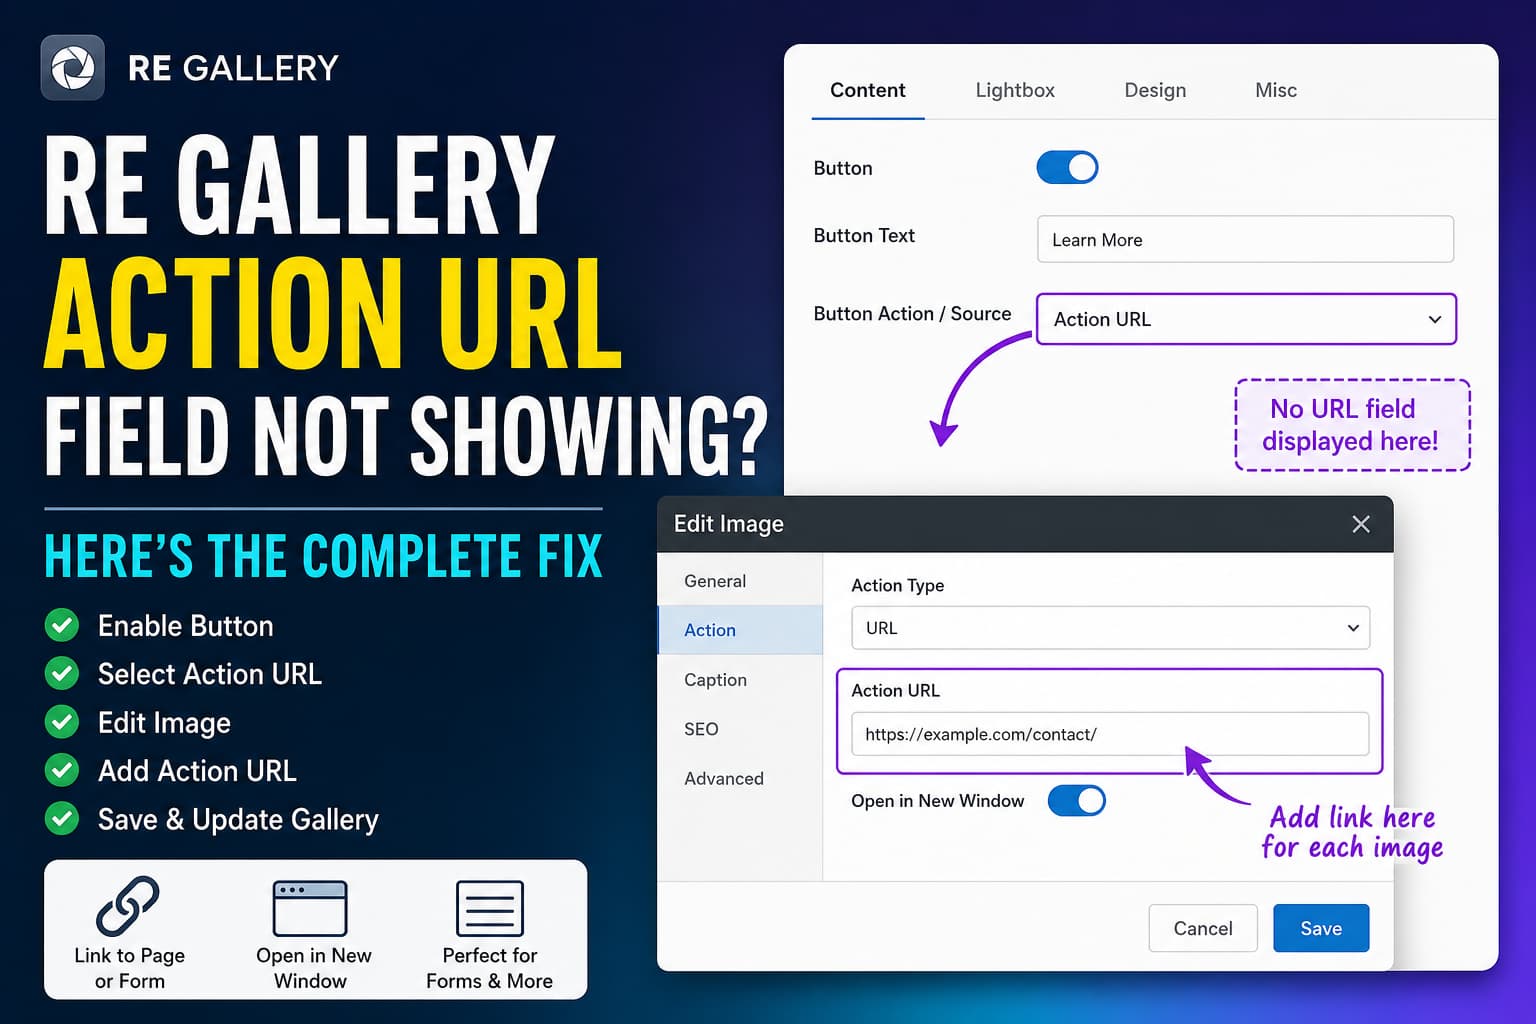
Are you trying to add a link to a button in the Re Gallery WordPress plugin, but no URL field appears after selecting Action URL?
This can be confusing because the Action URL option is available under the Content and Lightbox settings, yet selecting it does not provide a box where you can paste your link. In some cases, it may appear to return you to the gallery dashboard without saving the URL.
The good news is that this usually is not a plugin error.
The Action URL setting only enables URL-based actions for the gallery. The actual link must be added separately to each image through the Edit Image window.
In this guide, I will explain exactly where to find the missing Action URL field and how to use it to open a form, landing page, product page, or another website.
Why the Action URL Field Does Not Appear
Re Gallery allows every image in a gallery to have its own destination.
For example:
- Image one can open a contact form.
- Image two can link to a service page.
- Image three can open a product page.
- Image four can send visitors to an external website.
Because the links can be different for every gallery item, Re Gallery does not provide one global URL field inside the Content or Lightbox tab.
The Action URL option in those tabs only tells the gallery to use each image’s assigned URL. The actual destination is entered from the individual image settings.
This behavior was confirmed in the plugin’s official WordPress.org support forum. The support team explained that each image can have a unique link, so the URL needs to be entered through that image’s Edit Image modal. How to Add an Action URL in Re Gallery
Follow these steps to add a link to a gallery image or button.
Step 1: Open the Gallery Editor
Log in to your WordPress dashboard and navigate to:
Re Gallery → Galleries
Find the gallery you want to modify and click Edit.
Depending on your version of the plugin, the menu name or button position may look slightly different.
Step 2: Enable the Button
Inside the gallery editor, open the Content tab.
Find the settings for the gallery button and enable the button if it is currently disabled.
You may also be able to customize:
- Button text
- Font size
- Text color
- Background color
- Border
- Border radius
- Spacing
- Hover styling
Enter appropriate button text, such as:
- Contact Us
- Book Now
- Learn More
- View Details
- Open Form
- Get a Quote
Step 3: Select Action URL
Find the button action or source setting and select:
Action URL
Do not expect a URL input field to appear directly below this option.
Selecting Action URL only activates the link functionality. You must now assign a URL to the individual gallery image.
Step 4: Edit the Individual Image
Return to the gallery’s image list or image management area.
Hover over the image you want to link and click its Edit or pencil icon.
This should open the Edit Image modal.
Re Gallery uses individual image editing controls so information such as titles, descriptions, captions, alternative text, and links can be managed separately for each gallery item. The plugin’s current interface includes a custom editing popup for gallery images and videos. Step 5: Enter the Link in the Action URL Field
Inside the Edit Image modal, locate the field named:
Action URL
Paste the complete destination URL into this field.
For example:
https://example.com/contact/For an external form:
https://forms.example.com/request-a-quoteFor a page section:
https://example.com/services/#consultation-formFor an internal WordPress page, using the complete URL is usually safer than entering only a relative path.
Use:
https://example.com/book-an-appointment/Instead of:
/book-an-appointment/Step 6: Save the Image
Click Save, Update, or the equivalent confirmation button inside the Edit Image modal.
Closing the modal without saving may remove the URL you entered.
Step 7: Update the Gallery
After saving the individual image, click the main Update or Save Gallery button.
This second save is important because saving the image and saving the overall gallery may be handled as separate actions.
Step 8: Test the Gallery on the Front End
Open the page where the gallery is displayed.
Test the button from:
- A desktop browser
- A tablet view
- A mobile device
- A private or incognito window
Click the gallery button and confirm that it opens the correct destination.
How to Open a Form from a Re Gallery Button
The Action URL field opens a URL. Therefore, the easiest way to open a form is to place the form on a WordPress page and use that page’s URL.
For example, create a page called Request a Quote, add your form to it, and paste the page URL into the image’s Action URL field:
https://example.com/request-a-quote/This method works with most WordPress form plugins, including:
- Contact Form 7
- WPForms
- Fluent Forms
- Gravity Forms
- Formidable Forms
- Ninja Forms
- Elementor Forms
The gallery button does not need to know which form plugin you are using. It only needs the URL of the page containing the form.
How to Open the Form in a New Window or Tab
Check the button or link settings in the Content and Lightbox sections for an option such as:
- Open in new window
- Open in new tab
- Link target
- New window
Enable that setting when available.
After updating the gallery, inspect the button on the front end. A correctly configured new-tab link normally includes:
target="_blank"For security, links opening in a new tab should also use an appropriate rel value, such as:
rel="noopener noreferrer"When linking to an external form provider, opening the form in a new tab can prevent visitors from completely leaving your gallery page.
Opening a Popup Form Instead of Another Page
There is an important difference between opening a URL and opening an on-page popup.
The Re Gallery Action URL setting is designed to follow a link. It does not automatically convert a regular WordPress form into a modal popup.
To open a popup, your popup plugin must provide one of the following:
- A special trigger URL
- A CSS class trigger
- An HTML ID trigger
- A URL parameter
- A JavaScript callback
You would then use the trigger supplied by the popup plugin instead of a normal page URL.
For example, some popup tools can open a modal when a visitor clicks a link containing a particular hash:
https://example.com/gallery/#open-contact-formThe exact format depends on the popup plugin. Check that plugin’s documentation before adding the trigger to Re Gallery.
If the popup tool only supports CSS class triggers, Re Gallery may require additional customization because the Action URL field accepts a destination link rather than arbitrary JavaScript.
What to Do When the Edit Image Modal Has No Action URL Field
If you open the image editor but still cannot find Action URL, try the following troubleshooting steps.
1. Confirm That Action URL Is Enabled
Return to the Content or Lightbox settings and make sure the action source is set to Action URL.
If another source is selected, the image URL field may be hidden or unused.
2. Update Re Gallery
Go to:
Dashboard → Plugins → Installed Plugins
Check whether an update is available for Re Gallery.
Before updating a production website, create a backup and test the update on a staging site when possible.
3. Save and Reopen the Gallery
After enabling Action URL:
- Save the gallery.
- Return to the Galleries screen.
- Reopen the gallery.
- Edit the image again.
This can force the gallery editor to reload the newly enabled fields.
4. Clear WordPress and Browser Cache
Clear all relevant caches, including:
- WordPress caching plugin cache
- Server cache
- CDN cache
- Browser cache
- Page builder generated files
Then reopen the WordPress dashboard in a private browser window.
5. Check for a JavaScript Conflict
Re Gallery’s administrative interface uses JavaScript. A plugin or theme conflict can prevent editing fields or modals from loading correctly.
Open your browser developer tools and check the Console tab while editing the gallery.
Look for red errors such as:
Uncaught TypeErrorFailed to fetch403 ForbiddenREST API errorTemporarily disabling optimization features such as JavaScript delay, combine, minify, or defer may help determine whether an optimization plugin is interfering with the gallery editor.
6. Run a Plugin Conflict Test
Create a backup before performing this test.
Temporarily deactivate all plugins except Re Gallery. Then check whether the Action URL field appears.
If it works, reactivate the other plugins one at a time until the conflict returns.
Common sources of dashboard conflicts include:
- Security plugins
- Admin customization plugins
- JavaScript optimization plugins
- Caching plugins
- Page builder add-ons
- Plugins that restrict the WordPress REST API
7. Test with a Default WordPress Theme
Temporarily switch to a default WordPress theme on staging, such as a current Twenty Twenty theme.
Although the problem appears in the dashboard, themes can still load scripts or functions that affect WordPress administration screens.
8. Check the Browser Network Log
Open the browser’s developer tools and select the Network tab.
Edit the gallery and watch for failed requests. A failed REST API or admin-ajax.php request can indicate:
- A firewall block
- An expired security nonce
- Insufficient permissions
- A hosting rule
- A plugin conflict
- A server-side PHP error
Common Mistakes to Avoid
Looking for a Global URL Field
There is no single global URL field when each gallery image can use a different destination. Edit the individual image instead.
Forgetting to Save Twice
Save the image settings first, and then save the entire gallery.
Using an Incomplete External URL
Include the protocol:
https://A URL such as forms.example.com may not work correctly without it.
Expecting a URL to Automatically Open a Popup
A standard link opens a page or URL. A popup requires a compatible popup trigger.
Testing an Old Cached Gallery
Always clear the page cache after modifying gallery links.
Frequently Asked Questions
Why does selecting Action URL return me to the gallery dashboard?
The Action URL option is not the field where the destination is entered. It enables URL actions for the gallery. The actual URL must be added from the Edit Image modal for each gallery item.
Can every Re Gallery image use a different link?
Yes. Each image can have its own Action URL, allowing different images or buttons to open different pages, forms, products, or external websites. Can I link a Re Gallery button to a Contact Form 7 form?
Yes. Add the Contact Form 7 shortcode to a WordPress page and enter that page’s complete URL in the image’s Action URL field.
Can the button open a popup form?
It can open a popup only when your popup plugin provides a URL-compatible trigger. Otherwise, link the button to a dedicated page containing the form.
Why is the Action URL still not working after I entered it?
Confirm that Action URL is selected as the button action, save both the image and gallery, clear all caches, and check the browser console for JavaScript errors.
Final Solution
When the Re Gallery Content or Lightbox button does not show a URL box, do not keep searching inside the global button settings.
The correct process is:
- Enable the button.
- Select Action URL.
- Edit the individual gallery image.
- Enter the destination in that image’s Action URL field.
- Save the image.
- Update the gallery.
- Clear the cache and test the button.
The setting is organized this way because every gallery image can use a different link. Once you know that the URL belongs inside the individual image editor, the setup is straightforward and does not require custom code.
