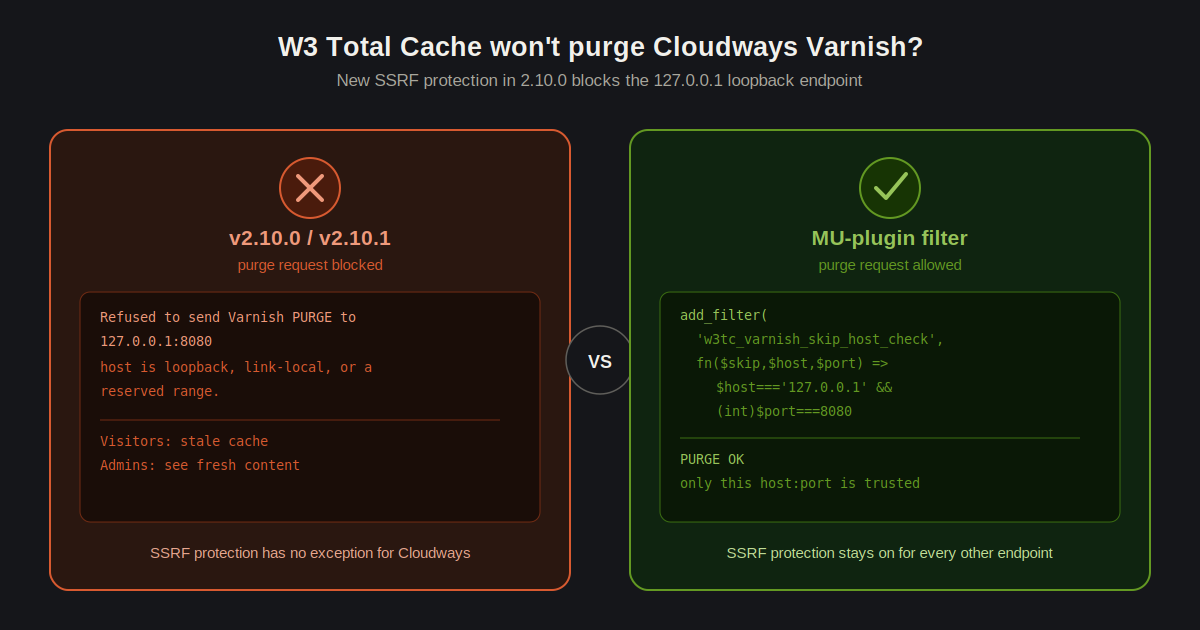
After updating W3 Total Cache to version 2.10.0 or later, some WordPress websites hosted on Cloudways may stop clearing the Varnish cache automatically.
The WordPress cache may appear to clear successfully, but visitors continue seeing outdated content. Manually purging the cache from the Cloudways dashboard fixes the issue temporarily, while rolling W3 Total Cache back to version 2.9.4 may make automatic purging work again.
This happens because W3 Total Cache 2.10.0 introduced stricter security checks for outbound requests. These checks can block Varnish PURGE requests when the configured Varnish server uses a loopback address such as:
127.0.0.1:8080This guide explains why the problem occurs, how to identify the correct Cloudways Varnish endpoint, and how to restore automatic cache purging safely.
Symptoms of the Problem
You may be experiencing this issue when:
- You update a page or post in WordPress, but visitors still see the old version.
- Clicking Empty All Caches in W3 Total Cache does not refresh the public page.
- The updated content appears while you are logged in but not in an incognito window.
- Purging the application cache from Cloudways immediately displays the changes.
- Downgrading W3 Total Cache to version 2.9.4 restores automatic purging.
- W3 Total Cache logs show that the Varnish PURGE request was refused.
- Your configured Varnish server is
127.0.0.1:8080.
This is usually not a failure of the Varnish service itself. The request may be blocked by W3 Total Cache before it reaches Varnish.
Why It Started After W3 Total Cache 2.10.0
W3 Total Cache 2.10.0 included several security improvements. One of those changes restricted outbound server-side requests to reduce the risk of server-side request forgery, commonly called SSRF.
The updated Varnish purging code checks the destination before sending a PURGE request. It can reject requests targeting:
- Loopback addresses such as
127.0.0.1 - Link-local addresses
- Cloud metadata endpoints
- Other reserved network ranges
The relevant W3 Total Cache code specifically identifies 127.0.0.0/8 as a loopback range. It also provides the w3tc_varnish_skip_host_check filter for administrators who have a verified reason to permit a particular internal endpoint. The plugin documentation within the source code gives a Varnish service on 127.0.0.1 as an example of such a case.
When the request is blocked, W3 Total Cache may produce an error similar to:
Refused to send Varnish PURGE to 127.0.0.1:
host is loopback, link-local, or a reserved range.
This security check remains present in W3 Total Cache 2.10.1. The 2.10.1 update fixes several other issues introduced in 2.10.0, but its changelog does not list removal of the Varnish host validation.
Important: Confirm Your Cloudways Varnish Endpoint First
Do not assume that every Cloudways server uses the same Varnish hostname and port.
Depending on the server configuration, Cloudways may require W3 Total Cache to send requests through:
- The Cloudways application hostname
- The application hostname with port
8080 - A local endpoint such as
127.0.0.1:8080 - Port
80through Nginx on newer configurations
Cloudways’ W3 Total Cache documentation currently recommends enabling Varnish purging under the Reverse Proxy settings. It states that non-SSL applications can use the application URL, while SSL applications may need the application URL with :8080 appended.
However, Cloudways has also changed its Varnish configuration on some servers so that PURGE requests must pass through Nginx with the required real-IP headers. A direct connection to Varnish may be rejected on those environments.
Before adding custom code, contact Cloudways support and ask:
What exact hostname and port should W3 Total Cache use to send Varnish PURGE requests for this application?
Use the endpoint Cloudways confirms for your server.
Solution 1: Use the Cloudways Application Hostname
This should be your first approach because it may avoid the loopback restriction without requiring custom code.
In your WordPress dashboard, go to:
Performance > General Settings > Reverse ProxyEnable:
Enable Varnish cache purgingUnder Varnish servers, enter the endpoint confirmed by Cloudways support.
For example, Cloudways may tell you to use:
your-application.cloudwaysapps.comOr, for an SSL application:
your-application.cloudwaysapps.com:8080Do not copy these examples without confirming the correct value for your application.
Click Save all settings, clear the W3 Total Cache cache, and test whether the updated page is visible in an incognito window.
If automatic purging now works, you do not need the custom filter described below.
Solution 2: Allow a Confirmed Local Varnish Endpoint
Use this solution only when Cloudways support confirms that your application should send PURGE requests directly to a local endpoint such as:
127.0.0.1:8080W3 Total Cache provides the following filter for audited internal Varnish endpoints:
w3tc_varnish_skip_host_checkThe filter should be limited to the exact host and port. Do not disable the security check globally.
Step 1: Create the MU-Plugins Directory
Using SFTP, SSH, or the Cloudways application file manager, open:
/wp-content/Create the following directory if it does not already exist:
/wp-content/mu-plugins/MU plugins, also known as must-use plugins, load automatically. They do not need to be activated from the normal WordPress Plugins screen.
Step 2: Create the Compatibility File
Inside the mu-plugins directory, create a file named:
cloudways-w3tc-varnish.phpThe complete path should be:
/wp-content/mu-plugins/cloudways-w3tc-varnish.phpStep 3: Add the Code
Paste the following code into the file:
<?php
/**
 * Plugin Name: Cloudways W3TC Varnish Compatibility
 * Description: Allows W3 Total Cache to purge a confirmed local Cloudways Varnish endpoint.
 */

defined( 'ABSPATH' ) || exit;

add_filter(
	'w3tc_varnish_skip_host_check',
	static function ( $skip_check, $host, $port ) {
		$allowed_host = '127.0.0.1';
		$allowed_port = 8080;

		if (
			$allowed_host === $host &&
			$allowed_port === (int) $port
		) {
			return true;
		}

		return $skip_check;
	},
	10,
	3
);
Save the file.
This code allows W3 Total Cache to skip the host validation only when both of the following values match:
Host: 127.0.0.1
Port: 8080
All other destinations continue to receive the security validation introduced in W3 Total Cache 2.10.0.
Why You Should Not Disable the Check Globally
You may find a shorter code example online:
add_filter(
	'w3tc_varnish_skip_host_check',
	'__return_true'
);
Do not use that version.
It disables the Varnish host safety check for every destination. If the Varnish server setting is later changed accidentally or maliciously, W3 Total Cache may send requests to an unintended internal endpoint.
The restricted code is safer because it permits only the exact host and port confirmed by Cloudways.
Update the Code When Your Endpoint Is Different
If Cloudways confirms a different local address or port, update these two lines:
$allowed_host = '127.0.0.1';
$allowed_port = 8080;
For example, when Cloudways confirms port 8081, use:
$allowed_host = '127.0.0.1';
$allowed_port = 8081;
The values in the code must match the endpoint entered under:
Performance > General Settings > Reverse ProxyDo not add multiple internal endpoints unless each one has been verified.
Clear All Cache Layers
After changing the Reverse Proxy settings or adding the MU plugin, clear every relevant cache layer.
Clear W3 Total Cache
In WordPress, go to:
Performance > DashboardClick:
Empty All CachesPurge the Cloudways Application Cache
In the Cloudways dashboard:
- Open the relevant server.
- Select the affected application.
- Go to Application Settings.
- Open the General section.
- Find Purge Site Cache.
- Click Purge.
Cloudways states that its Purge Site Cache option clears the selected application’s cache layers so visitors can receive the latest version of the website.
Clear Any CDN Cache
When the site uses Cloudflare or another CDN, clear that cache as well.
Otherwise, W3 Total Cache and Varnish may be working correctly while the CDN continues serving an older page.
How to Test the Fix
Use a simple visible content change to confirm that automatic purging works.
- Open a public page in an incognito or private browser window.
- Add a temporary sentence to that page in WordPress.
- Update the page.
- Click Empty All Caches in W3 Total Cache.
- Refresh the page in the incognito window.
- Confirm that the temporary sentence appears.
- Remove the sentence and test again.
The change should appear without manually opening the Cloudways dashboard and purging the application cache.
Test in a private window because logged-in WordPress users may bypass one or more cache layers.
Check Whether the MU Plugin Is Active
Go to:
WordPress Dashboard > Plugins > Must-UseYou should see:
Cloudways W3TC Varnish CompatibilityIf it is not listed, check:
- The directory is named exactly
mu-plugins - The PHP file is directly inside that directory
- The filename ends in
.php - The opening
<?phptag is present - The file permissions allow PHP to read it
The file should not be placed inside an additional subdirectory unless you also create a loader file.
Check the Response Headers
You can inspect the website’s response headers with:
curl -I https://example.com/Replace example.com with your website’s domain.
Depending on the Cloudways and CDN configuration, you may see headers such as:
X-Varnish
X-Cache
Age
Cloudways identifies X-Varnish and X-Cache as useful headers when checking whether Varnish is active and whether a response is being served from cache.
When Cloudflare is active, some origin cache headers may be hidden or replaced by Cloudflare headers. In that situation, temporarily pausing Cloudflare or using an origin-level test may provide clearer results.
Enable W3 Total Cache Debug Logging
When the issue continues, temporarily enable Varnish debugging in W3 Total Cache.
After enabling logging:
- Update a page.
- Clear the W3 Total Cache cache.
- Review the W3 Total Cache log files.
- Look for a refused PURGE message or an HTTP response code.
- Disable debugging after completing the test.
Before applying the compatibility filter, the log may contain:
Refused PURGE to 127.0.0.1:
host is loopback, link-local, or reserved range.
After the filter is applied, that specific refusal should disappear.
A different error, such as HTTP 403 or 405, may indicate that the request reached the server but Cloudways rejected the routing, headers, hostname, or port. In that case, the loopback filter alone is not the complete solution. Ask Cloudways to confirm whether the request must pass through Nginx.
Why Downgrading to Version 2.9.4 Is Not Recommended
Rolling back to W3 Total Cache 2.9.4 may make Varnish purging work again because that version does not contain the same outbound request restriction.
However, remaining on 2.9.4 is not a safe permanent solution.
Version 2.10.0 was a security-focused update that restricted outbound requests and strengthened several other security controls. The official changelog lists improved protection against SSRF, code injection, command injection, file inclusion, unauthorized configuration changes, and other risks.
In addition, security advisories identify W3 Total Cache versions up to and including 2.9.4 as affected by serious vulnerabilities, with version 2.10.0 listed as the patched release.
A rollback can be useful briefly on a staging website to confirm the cause, but a production website should use version 2.10.0 or later.
The safer approach is:
- Keep W3 Total Cache updated.
- Confirm the correct Varnish endpoint with Cloudways.
- Use a routable Cloudways hostname when supported.
- Add the restricted filter only when a loopback endpoint is explicitly required.
- Test automatic cache purging after the change.
What to Do When It Still Does Not Work
If the issue continues after following the steps above, check the following areas.
Varnish Is Disabled in Cloudways
The Reverse Proxy settings in W3 Total Cache only work when Varnish is enabled for the application in Cloudways.
Cloudways includes Varnish on its servers, but the service and application-level setting must still be active.
The Wrong Host or Port Is Configured
The value in W3 Total Cache must match the endpoint expected by Cloudways.
Possible configurations include an application hostname, port 8080, or routing through Nginx. Do not rely on an endpoint copied from another Cloudways server.
Another Cache Layer Is Serving the Page
Stale content may come from:
- Cloudflare
- Another CDN
- Browser cache
- Breeze
- A second WordPress caching plugin
- A service worker
- A hosting-level page cache
Avoid running two full-page WordPress caching plugins at the same time unless their responsibilities have been deliberately separated.
The Request Reaches Varnish but Is Rejected
An HTTP 405 Method Not Allowed response usually means the PURGE request reached an HTTP service but was not accepted.
This can happen when:
- The request uses the wrong port.
- The request bypasses Nginx.
- Required real-IP headers are missing.
- The Host header does not match the application.
- Cloudways VCL rules do not permit the request source.
Provide Cloudways support with:
- The application domain
- The W3 Total Cache version
- The configured Varnish hostname and port
- The approximate time of the failed purge
- The W3 Total Cache log entry
- The returned HTTP status code
Temporary Manual Workaround
Until automatic purging is restored, you can manually clear the application cache from:
Cloudways > Application > Application Settings > General > Purge Site CacheYou can also purge the server-level Varnish cache from the Cloudways server’s Manage Services section.
This is suitable as a temporary workaround, but it is not ideal for a frequently updated WordPress website. Editors should not need to log in to Cloudways every time they update a page, menu, template, stylesheet, or plugin.
Final Recommendation
W3 Total Cache 2.10.0 introduced an important security check that may reject Varnish PURGE requests sent to loopback addresses such as 127.0.0.1.
On Cloudways, the correct fix depends on the Varnish routing configured for the specific server.
Start by asking Cloudways support to confirm the required hostname and port. When possible, configure W3 Total Cache with the Cloudways application hostname rather than a loopback IP.
When Cloudways explicitly requires 127.0.0.1:8080, use the narrowly restricted w3tc_varnish_skip_host_check filter shown in this guide. Do not disable the host validation globally.
This approach restores automatic Varnish purging while retaining the security improvements introduced in W3 Total Cache 2.10.0.
